Tuesday, March 31, 2009

CUPCAKES: THINGS OF BEAUTY

Most of the time, I am quite glad that it is the year 2009. The only thing that makes me wish it were 1960 is this: the baked goods. In particular, cupcakes.


Weird, lovely, possibly sickening or delicious, highly intricate cupcakes made with buttercreams and meringues and trompe l'oeil decorations of, say, the Statue of Liberty made out of egg whites and shredded coconut, or whatever.

Wouldn't Dave be delighted if he came home from work and saw that I had spent my day constructing this:


While that may not technically be a cupcake, it very well might save my marriage:


Ladies, take heed. (Do click on that to enlarge it: it's fascinating. He returns to his wife mainly for her gingerbread -- and her relieved response is, of all things, It's that plantation molasses he used to have when he was a boy -- thanks to Brer Rabbit!)

Truly, though -- cupcakes are fun. Kids love them. The possibilities are endless. So I've compiled a short list of cupcakes that meet my Official Criteria for being Very Good Cupcakes.

OFFICIAL CRITERIA FOR VERY GOOD CUPCAKES:

1. They are relatively simple to make.

2. They are blatantly thematic. I love themes, I love kids, I love parties. Put those three things together and you have some idea of how I hope Heaven turns out.

3. Here's the shocker: They must be prepared (or preparABLE) with boxed cake mix. I like to decorate the little buggers; I will not waste my time making cupcake batter from scratch. I'd rather spend four hours slicing licorice whips into tiny threads, thank you.

Here are some cupcakes suitable for birthday parties or just for fun. I've arranged them in four categories according to difficulty. I think you'll be delighted at just how EASY they are. And if you've got a cupcake up your sleeve (not literally, I hope) please do share. I may even start a Cupcake of the Week feature (although I'm leaning towards a Birthday Theme of the Week feature -- then I can combine my two loves).

And now, I am off to construct the Taj Mahal out of marshmallows, in the hopes of securing a happy marriage. Enjoy the cupcakes!

Posted by Picasa

Level One: So Easy, Your Husband, I Mean Kid, Could Do It

TEDDY BEAR PICNIC CUPCAKES


Aren't those great? So simple, but perfect. Your preschooler could invite over some friends, have them each bring their teddy bear, and play; have a little picnic with triangular sandwiches and apple wedges; and finish off with these adorable cupcakes. Here's the easy-peasy recipe.


ICE CREAM CONE CUPCAKES


The only difficult thing about these is getting them to stand up. I am convinced that they glue them to the plates in these pictures. (Also, the icing in the picture is probably made of shaving cream or something. You know how sneaky those "food stylists" are.) But making these is simplicity itself. Buy a box of confetti cake mix; prepare and pour into a cupcake pan; and smack an ice cream cone on top. Bake them that way, and the cupcakes puff up to fill the cones. Turn them over, ice them, and they look great! They are also wonderful for toddlers and preschoolers because they are much less messy than a traditional cupcake. Plus, it's super cute to see a bunch of icing-faced kids wandering around in their glory, munching on a cupcake on a cone.


Am I right?

Here's the recipe.

See? Mine wouldn't stand up with any reliability.


Certain partygoers did not seem to mind.


SPIDER CUPCAKES

These are from Nora's third birthday party. Make chocolate cupcakes and frost with chocolate icing; decorate with jimmies. To make the eyes, slice a big marshmallow in half and "glue" an M and M on each half with chocolate icing. The nose is another M & M, and the legs are black licorice whips. These are great for Halloween, too, of course. They look really cute "in person."

WORM IN THE DIRT CUPCAKES


This may be the easiest cupcake recipe ever. Frost a cupcake with chocolate icing. Break a gummy worm in half and stick each half into the frosting. Then, cover with chocolate cookie crumbs or graham cracker crumbs. They actually look SO lifelike that a few of the kids at Nora's party (as well as her daddy) were a little scared to eat them. ;)

FROG CUPCAKES

SO easy. The baker here decided to ice the top of the cupcake in blue so that the frog is "peeking" out of the water. However, I think I'd color the whole cupcake green so that the top of the cupcake is the frog's mouth/face. I think it's less confusing. I know, this is really controversial here. WHICH SIDE ARE YOU ON?
Now, get ahold of yourself, please.. Here's the recipe.
TIC-TAC-TOE CUPCAKES
Don't you want to host a game party just so you can make these?

Here's the recipe.


Posted by Picasa

Level Two: A Little More Effort

PET PARADE
These are easy and cute, and kids can even decorate their own at the party. You don't need fancy icing bags or tips; if you don't have them, just use foldover plastic bags, fill with icing, and snip a tiny corner to pipe the icing out of. You can read the complete recipe here.


SPORTS CUPCAKES

Here is the recipe.


I couldn't get the picture to download for some reason, but here is a recipe for fantastically cute little penguin cupcakes.

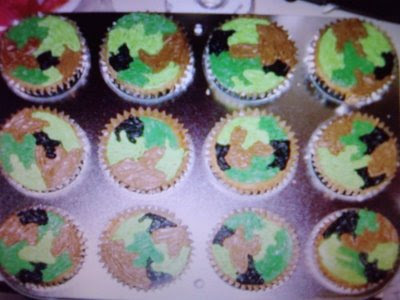
CAMO CUPCAKES
There are two varieties I found online: those made with fondant

and those made with dyed food coloring.


Fondant scares me. It looks so easy. I bought some one time,though, and it was a dry, unworkable mess. I've never gone back. However, re-reading how Camo Cupcake Mom #1 made hers, it sounded so simple: she rolled out some colors of fondant, cut the little shapes, and stuck 'em on chocolate frosting. How hard can that be?! (Famous last words.)

Camo Cupcake Mom #2 is clearly a perfectionist; she got all those edges of food coloring lined up without excess smearing and blending. I think that's harder than it looks. Still, I think anyone who did a trial run a couple weeks before a birthday party could do these fairly easily. And they're pretty cool. You go, Camo Cupcake Moms.
Posted by Picasa

Level Three: Involved, But Doable Cupcakes

CLOWN CUPCAKE

This clown is far from creepy. It's downright cute. (It's a Martha Stewart recipe, of course.) These would be perfect for a carnival or circus-themed party. They look difficult, but the only hard part is cutting a triangular core out of each cupcake to use as the clown hat. Okay, now that I wrote that out, it's downright intimidating. But with a small, sharp, serrated knife and a few practice runs (I'd bake a whole extra batch), I think it could be mastered. Then all you have to do is affix some colorful candies, and you've got these darling cupcakes. Maybe I'll test out this recipe and let y'all know how it goes. 'Cause I'm sure the two people who look at this blog are waiting on pins and needles....

LEGO CAKE

These are not actually cupcakes, but because they are single-serving size I decided to include them. Also, they're awesome. And easy: you just cut a sheet cake or two up into rectangles and ice them. The knobs on the tops of each Lego are frosted marshmallows! GENIUS!

Here's a variation that is, decidedly, a CAKE:


BUG CUPCAKES

These are not hard at all, but affixing all those durn candies (and having to buy so many types of candy) lands them in the "involved" category. They are not all that different from the bug cupcakes I made for Nora's 3rd birthday (which I will share later -- they were easy and cute!). Here's the complete recipe from bettycrocker.com.
Posted by Picasa

Level Four: "I Have a Little Secret" Category

Now here's where it gets really fun. The following cupcakes look like something made by Pixar. But they are EASY. The secret? Little cupcake wrappers called "Roundabouts."

"Roundabouts" make impossible-looking cupcakes easy for us laypeople who might be dangerous, or at least awkward, with a pastry bag. Most styles are $8.99 for a dozen roundabouts: pricey, but worth it, I think, if cupcakes are your thang. (Plus, you save a lot of money on all the millions of weird little candies you'd have to buy -- and then have sitting in your cupboards until they turn rock-hard because you only used five of each -- if you made intricate cupcakes all on your own.)

Popcorn, anyone?!

It's ingenious. You put the "roundabout" wrapper on the outside of your cuppy cake, and make the "popcorn" out of mini marshmallows that you cut in two and then squeeze back together.

Now, these are for sophisticated, highly cultured kids, OR adults, but I thought they were hilarious:

Again using the mini mallows, and bam, we have George:
Posted by Picasa

Level Crazy: "Impossible But too Cool Not to Post" Category

LOOK at these, people, and geek out with me.

What little boy (or girl) wouldn't love that???!!!

And how about these Super Mario cupcakes:

Space Invaders:


These were professionally done (using fondant, which frightens me). Pac Man!!:

These games are probably too "old" for kids' cupcakes anyway. These would be for, like, your IT guy at work's birthday, or maybe your geeky husband's. (No, I don't mean to suggest that YOUR husband is geeky.)

Thanks for reveling in cupcakes with me. 'Til next time.

Posted by Picasa

Sunday, March 29, 2009

Easter Coloring Pages

These are all free to print out on your computer. I've included secular and religious pages below.

Secular

Cute bunny with eggs

Cute bunny with bow in hair

"Kids dressed up for Easter" coloring page

Beautiful patterned egg to color #1

Beautiful patterned egg to color #2

Beautiful patterned egg to color #3

Very pretty picture of bunny with egg

Realistic chicks in basket coloring page

Patterned Easter eggs to color

Bunny in basket

Bunny painting an Easter egg

Chick and Easter egg

Singing/dancing chicks with Easter egg

Lamb with Easter basket

Religious

The Ministry of Jesus (free online coloring book)

Cross w/ flowers coloring page

Jesus Arrives on Palm Sunday coloring page

The story of the Resurrection (Matthew 28), adapted for preschoolers (story)

John 20 adapted for children under 4 (story)

"He is Risen" Easy Shapes greeting card template
-- Cut out the shapes and allow your child to arrange them on a piece of folded construction paper. Some can be glued and others applied with bits of folded tape, to give a "3D" effect.


Easter Bonnet Craft (picture coming soon)

-- a few sheets of newspaper or tissue paper
-- roll of masking tape
-- stickers, silk flowers, other little decorations for top of hat (whatever you have on hand)

Take a few sheets of newspaper or tissue paper. Have your child stand upright and look straight ahead. Place the paper on his/her head and then tape a band of masking tape around the child's head at about top-of-ear level. (Better to go lower than higher.) This will make the top of the hat so it will fit on child's head without sliding off.

Roll up all of the paper below the tape "brim." Roll it right up to the level of the tape, so you have the brim of the hat.

Decorate hat with stickers, silk craft flowers, leaves, tissue paper, whatever you have on hand. These are really adorable! Nora wore hers around til it practically disintegrated!

........................................................................................

Milk Carton "Easter Baskets"

Wash out an empty milk carton and let dry.

Use an Xacto Knife to cut off the bottom 2/3 of the carton.

Let child paint or decorate as desired. (Nora loves painting boxes -- she goes nuts -- paints the inside, bottom, etc. Don't know quite what makes it so exciting, but it works...)

When dry, glue a strip of construction paper across the top as a "handle." Or punch 2 holes and thread pipe cleaners through for a handle.

Birds' Nests


Eggs and Nests recipe:
-- 1/2 cup peanut butter chips
-- 1/2 cup peanut butter

Melt; stir in about 1 1/2 cups dry chow mein noodles (you'll want them to be evenly coated). Arrange in nest shapes on wax-paper-covered baking sheet. Place jelly bean or chocolate eggs in middle. Refrigerate til firm. Yum! (They end up tasting kind of like crunchy donuts.)

(originally posted in May 2008, but perfect for spring, so I had to re-post)

Friday, March 27, 2009

Dyed Craft Rice
Recipe from amazingmoms.com

-- Kids love squeezing glue onto construction paper and then pouring colored rice over the glue to make patterns with texture.

-- Add to your collage box as another collage medium.

--Pour different colors of rice into bottles (as with sand art) -- pretty!

-- Teach your little ones their letters
by writing in glue on paper and letting them sprinkle or press the colored rice on top.
After it dries, they can trace the letter with their
finger tip.

You’ll need :

Uncooked white rice
Food color
Vinegar

Place 1/2 cup rice into a bowl. Add ~ 5 drops
of coloring and 1/2 tsp. vinegar
to set the color. Spread flat onto a baking sheet.
Bake at 200 for 45 min to dry.

You may wish to make more colors at the same time.
Be sure to keep them separate when baking.
After they dry, they can be packed together.

Easter Bunny paper doll and clothes

Thanks to Danielle's Place for this fun template.

Bunny template

Clothes Pattern 1

Clothes Pattern 2 with Easter basket and hat

Simply print out templates (heavier paper, if you have it, will last longest), let your child color/decorate them, and then cut them out. Your child can dress the bunny paper doll and/or use it as an Easter decoration. Simple, fun, and free -- that's how I like my kids' crafts. ;)

Wednesday, March 25, 2009

SPRING RAINBOW

This sweet and simple suncatcher is a fun craft to make for spring. My daughter enjoyed it so much, we made another one the next day! This would also make a good Sunday school craft, or a gift from a small child to a teacher at the end of the year.

You'll need:
-- a sheet of wax paper
-- a sheet of white paper
-- dyed pasta (instructions below)
-- glue

1. Have your child draw the outline of a rainbow on a sheet of white paper (or draw it for them). (My 3-year-old was able to draw the outline, but I had to draw the inside lines for her.) Lay the white paper beneath the wax paper as a template.

2. Arrange dots or stripes of glue along each "color strip" of the rainbow.


3. Arrange pasta, color by color, along each strip. (You will see that my daughter insisted on making a "reverse rainbow," foiling what I thought was foresight in dyeing the most pasta red and the least pasta purple).

4. Let dry. When dry, punch a small hole between the red and orange strips of color and hang with ribbon, yarn, or string in a sunny window.

There you have it. A rainbow!
Posted by Picasa

How to dye craft pasta

Craft pasta is so pretty,
 

and the possibilities are nearly endless!

It's easy to dye your own craft pasta. You'll need:

-- dry pasta
-- food coloring (squirty dropper-tubes, you know, the regular ol' fashioned kind)
-- newspaper to cover your surface
-- rubbing alcohol

Here's how you do it:

1. Protect your surface by laying out newspaper.

2. Splash a dab (about quarter-cup) of rubbing alcohol into a Ziploc baggie. Then squeeze in as many droplets of food coloring as you'd like, to get the desired color. (You'll see in the pictures above that Nora's rainbow is much lighter; that was the first batch of pasta. I wanted the colors darker, so I re-dyed the remaining pasta that night -- my husband was shaking his head at me -- and we made a brighter rainbow the next day. It all depends on how you like it!)

3. Toss in handfuls of pasta. Seal the bag. Shake it around to evenly distribute liquid.

4. Lay flat, turning bags over occasionally. If you want bright colors, use plenty of food coloring and let it sit for a while!


5. Shake the pasta directly onto the newsprint to dry. It dries quickly, within a couple of hours. Don't worry about separating each little piece of pasta because they break apart easily once fully dry.

You need to use the rubbing alcohol because it keeps the pasta from turning into mooshy, starchy goo. In fact, it has a great feel when it's finished. However, it is INEDIBLE. Make that clear to your kid, 'cause it looks like candy!

Now that we all know how to dye our own pasta, I'm going to look up all kinds of crafts that we can do with it.
Posted by Picasa

CLOUDS


To make your own puffy clouds,

you'll need:
-- quilt batting or stuffed animal filler
-- blue construction paper
-- glue

Simply let your child squirt away with glue on the blue paper. Cut or tear the batting into various shapes, and make some fun clouds!

We printed out pictures of the three main types of clouds and chatted about how they looked different, and when you might see each one. Then, Nora made her own clouds. We made each of the three main types, and then she decided she was fondest of Cumulus clouds (the big puffy ones), so she made a few more sheets of those. This simple little activity was a hit; we made more clouds again over the next few days!

CLOUD IN A JAR

When I read this one online, I knew I had to try it. (See Nora above -- the anticipation was killing her!) :)

To make a cloud in a jar, you need:

-- a vase or jar
-- a match
-- a bag of ice (we used frozen hash browns)

Run your tap water til it's good and hot; fill the jar about half full. After a minute, pour out all but an inch or so of water.

Light a match. Hold it inside the mouth of the jar for about twenty seconds (or until you have to let go of it!). (You'll see I have black paper around our jar because I read online to do that, but it was an unnecessary step.)

Quickly put the bag of ice on the mouth of the jar to cover it. A small cloud should form inside your jar.

This did work, although the actual event was so thrilling that we didn't get any pictures of it. However, remember your audience: Nora was slightly disappointed. "Is it gone?" she cried. "I wanted to let it out of the jar to play with me."

GREAT CLOUD SITES FOR KIDS

--"Clouds That Look Like Things" -- see pictures of clouds that look like animals, trains, and more! Fun!

-- "Pretty Clouds" -- same web site, different focus

-- NASA's web page about clouds for kids. Great photos; info is slightly more advanced, but you can choose what to read to your child from the web site if s/he doesn't read yet.

-- Did your child ask you a question about weather or clouds that you don't know the answer to? It's probably here.

OTHER CLOUD ACTIVITIES:

-- Child Fun suggests letting your child finger paint in shades of blue, gray, and white on a two sheets of paper. Turn the sheets back-to-back and cut out a cloud shape. Staple around most of the shape, leaving enough room to stuff the cloud with tissue paper, batting, or crumpled newspaper. Then staple it all up. You can hang it with string/yarn/ribbon for a window. If your child did a few, I bet they'd look really pretty together!


-- Your child can make a "cloud" on the back of a spoon:

Have your child blow warm air into her hand. Explain that the air feels warm and moist because it is full of tiny water droplets, just like in a cloud.

Hand your child a cool spoon. Have her blow on the rounded back of the spoon. See how "fog" forms on the spoon.

Explain that this is exactly like a cloud you'd see in the sky. It's made when cool air and warm, moist air come together!

Posted by Picasa

Flowering Cherry Tree Craft


So pretty and simple! Check out how to make this pretty tree with your child at No Time for Flashcards.
Posted by Picasa

Spring vase craft

This is an easy craft you can do with things you have lying around. Good for pretty much any age, 18 months and up (with varying levels of assistance).

You'll need:

a plastic container (we used an empty plastic bottle of those Gerber "Puffs" snacks)
paper
paints or pens
stickers and any collage materials you might have
1. Have child paint (or color) a piece of paper wide enough to wrap around your chosen "vase."

2. Tape the paper to the vase, adding glitter, pom-poms, feathers, etc. as desired.

3. An open mouth helps greatly with concentration. :) When vase is decorated to child's liking, let dry, then fill with flowers and water. Voila! Ours has been on the kitchen table for a week, and I actually think it looks kind of pretty!
Posted by Picasa